Limewashing in progress
Limewash is slaked lime or calcium hydroxide, Ca(OH)2. It is made by heating limestone, CaCO3, in a lime kiln to produce quicklime, CaO. This is then slaked by adding some water to produce the slaked lime. We bought the calcium hydroxide as lime putty from Potmollen Paints of Warminster. It has the consistency of cream cheese and is diluted down to the consistency of single cream for use. The lime putty came with linseed oil added so that the covering would be more water repellent. This caused some problems when adding the colour.
We applied to the Council for planning permission to carry out the work. We needed to repair a patch of render that had come off and then to limewash the whole of the front of the house in the correct colour. We were asked to prepare samples both of the render and the limewash colour. Elizabeth worked on the render technique and made up a mixture of 8 parts sand, 2 parts lime, 2 parts stone dust and 1 part hair. Small stones were added to the top coat to give an appropriate rough finish. When the Conservation Officer came to see the samples she chose the roughest of the textures that Elizabeth had produced. I had worked on the colour of the limewash and had used a measuring jug and standard teaspoons to add different amounts of iron II sulphate to a fixed volume limewash. The Conservation Officer chose a colour in the middle of the range that I had produced. To make this, 3 standard cups (750ml) of crystals were added to 10 litres of limewash. It is hoped that this will weather down to the same colour as the Flemish Weavers‟ Cottages.
When limewash, calcium hydroxide, is exposed to the air it slowly reacts with carbon dioxide to produce calcium carbonate.
Ca(OH)2 + CO2 > CaCO3 + H2O
In effect it has returned to the original limestone from which it came. This is very insoluble and so produces a coat- ing that will only weather away over a long period of time.
For the colour we added pale green iron II sulphate crystals. At first I bought a kilogram of these from the Highgate School Chemistry Department but then discovered that commercial moss killer is the same chemical and is much cheaper so I bought it from Whitehall Garden Centre.
We found that the added linseed oil reduced the solubility of the iron II sulphate in the limewash and so made it very hard to mix in properly. Fortunately we had one tub of lime putty without the added linseed oil and so were able to make up a small amount of limewash from this to get all the crystals dissolved. We could then add the other limewash to make up the correct quantity. We wetted the walls then applied the limewash with the brush from a dustpan and brush set. It had natural bristles which gradually wore down. The six coats of limewash wore out two brushes.
The iron II sulphate at first reacts with the calcium hydroxide to produce iron II hydroxide.
FeSO4 + Ca(OH)2 > Fe(OH)2 + CaSO4

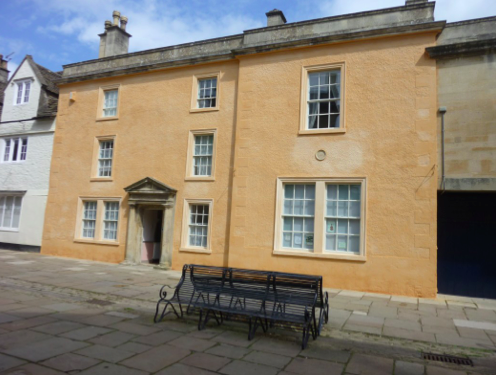
Parkside after limewashing
This produces a dreadful dark green/grey colour that looks like slimy mud and that was the colour that appeared on the walls when first brushed on. You can imagine that that produced a few comments from passers-by! Within a few minutes the iron II hydroxide is oxidised by the air to produce bright orange iron III hydroxide. Again there were plenty of comments!
Fe(OH)2 + O2 + 2H2O > 4Fe(OH)3
As the limewash dries the white colour predominates and the orange colour tones down to a relatively pale yellow.
Over a period of time the iron III hydroxide also reacts with carbon dioxide in the air to produce iron III carbonate. However, the yellow colour is unchanged.
2Fe(OH)3 + 6CO2 > Fe2(CO3)3 + 3H2O
It had been decided that we would limewash the window surrounds and Celia James (who helped us with the work) had the idea of using a paler colour on these. We used 2 cups of iron II sulphate crystals (500ml) to 10 litres of limewash. This gave a colour which is similar to that of the natural stone.
These chemical processes require damp conditions so it is usual to limewash in the spring or autumn. We chose to do the work in April 2010 but it was unseasonably dry and warm so we had to do a lot of wetting with a garden spray to allow the render and limewash to dry more slowly.
We had learnt a lot from the work that had been done to the back of the house ten years earlier. Two coats of limewash had been put on much more thickly and this had not weathered well. We hope that six thinner coats will do better. Ideally we would have allowed more time between coats but we had a time restraint because of the scaffolding. We found it necessary to do a whole coat at one time and from one batch of limewash otherwise the result was patchy and lines could be seen where different mixes joined.
Humphrey Barnikel
